Yolo实验指南
前言
该指南用于对目标检测模型yolo的实验用途。
本文遵循CC BY-NC 4.0协议,转载请标明出处。
必要条件:Nvidia系列显卡,建议显存大于4GB。
配置环境
安装IDE
可以选择多款PythonIDE,本文以Pycharm为例。
下载并安装Pycharm。
Pycharm是一款由jetbrain公司推出的专门用于python项目编写的IDE。
该公司有学生免费使用政策,可以去官方申请。
创建项目
1.输入项目名称
2.选择自定义环境,并选择Generate new。
3.类型选择Virtualenv。
Virtualenv是python项目环境,该环境若不特殊设置,只用于该项目。你也可以自己去学习下Anaconda的安装配置方法,使用Anaconda。
4.Base Python选择一个合适的python版本。(本文python版本为3.10.11)
5.点击创建后等待完成。
此时,若你在新建项目界面并未取消勾选创建main.py欢迎脚本
则可以看见该文件以及一个venv文件夹。
你可以尝试运行该脚本,会正常输出Hi, PyCharm
venv文件夹为项目环境放置处。
配置Yolo环境
Yolo要求pytorch以及CUDA支持。
所以我们需要去官网下载。
下载pytorch
进入官网,我们按要求选择。
PyTorch Build Stable
Your OS Windows
Package Pip
Language Python
Compute Platform CUDA 12.1
注意CUDA版本请检查自己的配置版本
并按照最先两位数字选择
查看CUDA版本方法:在CMD中输入nvidia-smi,可以在输出的第二行找到CUDA Version,我这里是CUDA Version: 12.4,故我选择了12.1。若为11.x的版本请选择CUDA11.8
此时可以看到下面有一串命令行。
比如我这里就是
pip3 install torch torchvision torchaudio --index-url https://download.pytorch.org/whl/cu121复制这串指令,在你的项目界面按下Alt+F12打开控制台,并将其键入
此时将开始下载pytorch。
pytorch有几个G下载速度可能略慢,请耐心等待,无法下载请百度“如何替换pip镜像源”,将pip下载源换为国内镜像源后,重新尝试下载。
下载完成后请尝试输出以下代码
import torch
torch.__version__
如果配置完成,则会显示版本号+cuda号
例如我这里的输出则是
2.2.2+cu121到此,最重要的pytorch就安装完毕了。
配置Yolo
获取yolo
如果你有git基础,可以直接在github库拉取Ultralytics
yolo经历过创造者的更替,目前由Ultralytics组织持续开发,故yolov8库已改名为Ultralytics
对于没有git基础的同学,本指南并不打算教学git以及安装方法。
请在库界面点击CODE,Download ZIP,将源代码压缩包解压至项目文件夹内。
此时我们的项目拥有main.py ultralytics-main venv三个文件夹
此时可以将初始脚本删除。
安装yolo所需库文件
yolo需要一些库文件
请按下Alt+F12打开终端,并输入
cd ultralytics-main建议了解下cd等控制台指令,本指南不会讲解
进入该文件夹
然后运行
pip install -e .注意结尾的句号也要包含
此时会开始执行所需的包安装。(若安装超时,请尝试更换镜像源或配置代理)
等待安装结束后,yolo运行所需的所有库文件就已经全部安装完毕了。
运行yolo
在第一次接触yolo时会觉得文件结构相当复杂,实际上还是相当有序的。
我们可以尝试在yolo根目录创建一个新的python脚本,输入官方文档中的内容进行测试。
代码如下
if __name__ == '__main__':
    # 加载模型
    # model = YOLO("yolov8n.yaml")  # 从头开始构建新模型
    model = YOLO("yolov8n.pt")  # 加载预训练模型(建议用于训练)

    # 使用模型
    model.train(data="coco8.yaml", epochs=3)  # 训练模型
    metrics = model.val()  # 在验证集上评估模型性能
    results = model("https://ultralytics.com/images/bus.jpg")  # 对图像进行预测
success = model.export(format="onnx") # 将模型导出为 ONNX 格式注意这里我对官方示例程序做了一些更改,具体更改为:1.将程序放置在main函数中,若不放入主函数,则会因为多线程不确定等问题报错失败。2.将第一句注释掉了,第一句为为从头构建模型所用,为模型定义了架构,我们实验所做的也只是更改这个yaml架构。此处仅仅是尝试运行,直接使用原版预设模型即可。
若果正常运行,他会在根目录下载yolov8n.pt的模型文件,并尝试预测网络上的几张图片。
同时创建一个叫做run的运行结果文件夹,其中包含一个detect文件夹,在其中为运行结果。
你可以查看运行结果文件夹中的train_batch.jpg来直观的查看效果
认识Yolo程序结构
前文提到的yaml,则是我们实验的重点部分。
可以在以下路径找到yolov8最原始的yaml文件。
ultralytics-main/ultralytics/cfg/models/v8/yolov8.yaml
# Ultralytics YOLO 🚀, AGPL-3.0 license
# YOLOv8 object detection model with P3-P5 outputs. For Usage examples see https://docs.ultralytics.com/tasks/detect

# Parameters
nc: 80 # number of classes
scales: # model compound scaling constants, i.e. 'model=yolov8n.yaml' will call yolov8.yaml with scale 'n'
  # [depth, width, max_channels]
  n: [0.33, 0.25, 1024] # YOLOv8n summary: 225 layers,  3157200 parameters,  3157184 gradients,   8.9 GFLOPs
  s: [0.33, 0.50, 1024] # YOLOv8s summary: 225 layers, 11166560 parameters, 11166544 gradients,  28.8 GFLOPs
  m: [0.67, 0.75, 768] # YOLOv8m summary: 295 layers, 25902640 parameters, 25902624 gradients,  79.3 GFLOPs
  l: [1.00, 1.00, 512] # YOLOv8l summary: 365 layers, 43691520 parameters, 43691504 gradients, 165.7 GFLOPs
  x: [1.00, 1.25, 512] # YOLOv8x summary: 365 layers, 68229648 parameters, 68229632 gradients, 258.5 GFLOPs

# YOLOv8.0n backbone
backbone:
  # [from, repeats, module, args]
  - [-1, 1, Conv, [64, 3, 2]] # 0-P1/2
  - [-1, 1, Conv, [128, 3, 2]] # 1-P2/4
  - [-1, 3, C2f, [128, True]]
  - [-1, 1, Conv, [256, 3, 2]] # 3-P3/8
  - [-1, 6, C2f, [256, True]]
  - [-1, 1, Conv, [512, 3, 2]] # 5-P4/16
  - [-1, 6, C2f, [512, True]]
  - [-1, 1, Conv, [1024, 3, 2]] # 7-P5/32
  - [-1, 3, C2f, [1024, True]]
  - [-1, 1, SPPF, [1024, 5]] # 9

# YOLOv8.0n head
head:
  - [-1, 1, nn.Upsample, [None, 2, "nearest"]]
  - [[-1, 6], 1, Concat, [1]] # cat backbone P4
  - [-1, 3, C2f, [512]] # 12

  - [-1, 1, nn.Upsample, [None, 2, "nearest"]]
  - [[-1, 4], 1, Concat, [1]] # cat backbone P3
  - [-1, 3, C2f, [256]] # 15 (P3/8-small)

  - [-1, 1, Conv, [256, 3, 2]]
  - [[-1, 12], 1, Concat, [1]] # cat head P4
  - [-1, 3, C2f, [512]] # 18 (P4/16-medium)

  - [-1, 1, Conv, [512, 3, 2]]
  - [[-1, 9], 1, Concat, [1]] # cat head P5
  - [-1, 3, C2f, [1024]] # 21 (P5/32-large)

  - [[15, 18, 21], 1, Detect, [nc]] # Detect(P3, P4, P5)
请结合图片对应每行内容
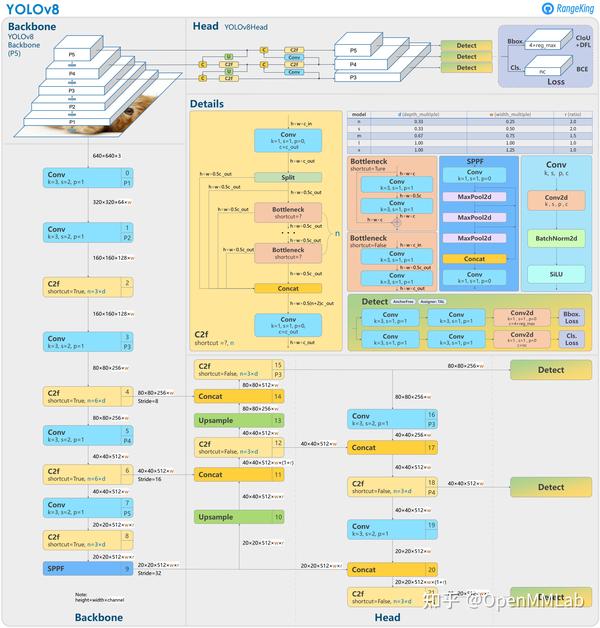
nc代表类型数,不用修改
scales也同样不用修改
主要修改部分为backbone以及head头
你可以通过删除或者增加或者修改某些部件来实现效果的强化。
具体添加方式多种多样,关于yolo更改的内容可以关注b站up主魔傀面具
该up主的新手教程也建议观看
三次修改都能够增强,你就成功完成了一次实验,则可以开始撰写论文了。
至少提升一两个大点(10%-20%)的准确度。
我们要做的
这里指的是实战中,我们大致会经历的所有步骤
1.寻找数据集
我们可以在一些AI平台上寻找到公开的数据集,比如飞桨AI Studio
下载后解压。
2.清洗数据集
从网络上获取的数据集可能混杂一些无关内容,通过python脚本来清洗
一般使用AI平台下载的数据集都是处理过的,并不需要这一步
(可选)数据集增强
当我们的获取到的数据集过少时,可以通过数据增强的方式来增加数据集
简单来说就是旋转,镜像,遮罩,色相等方法来使原数据集呈现出崭新的样子。
3.数据集拆分
我们的数据集将会被分为三份
训练集
测试集
验证集
一般来说,训练集占大头。
这个也可以通过网络上的代码直接取用。
import os
import random
import shutil
import time
import yaml

from wepy import get_logger, init_logger, GLOBAL_ENCODING

class YOLOTrainDataSetGenerator:
    def __init__(self, origin_dataset_dir, train_dataset_dir, train_ratio=0.7, val_ratio=0.15, test_ratio=0.15,
                 clear_train_dir=False):
        # 设置随机数种子
        random.seed(1233)

        self.origin_dataset_dir = origin_dataset_dir
        self.train_dataset_dir = train_dataset_dir
        self.train_ratio = train_ratio
        self.val_ratio = val_ratio
        self.test_ratio = test_ratio
        self.clear_train_dir = clear_train_dir

        assert self.train_ratio > 0.5, 'train_ratio must larger than 0.5'
        assert self.val_ratio > 0.01, 'train_ratio must larger than 0.01'
        assert self.test_ratio > 0.01, 'test_ratio must larger than 0.01'
        total_ratio = round(self.train_ratio + self.val_ratio + self.test_ratio)
        assert total_ratio == 1.0, 'train_ratio + val_ratio + test_ratio must equal 1.0'

    def generate(self):
        time_start = time.time()
        get_logger().info(f'start to split origin data set. \n'
                          f'origin_dataset_dir:{self.origin_dataset_dir},\n'
                          f'train_dataset_dir:{self.train_dataset_dir},\n'
                          f'train_ratio:{self.train_ratio},val_ratio:{self.val_ratio}, test_ratio:{self.test_ratio}')
        # 原始数据集的图像目录,标签目录,和类别文件路径
        origin_image_dir = os.path.join(self.origin_dataset_dir, 'images')
        origin_label_dir = os.path.join(self.origin_dataset_dir, 'labels')
        origin_classes_file = os.path.join(self.origin_dataset_dir, 'classes.txt')
        if not os.path.exists(origin_classes_file):
            get_logger().error(f'classes file is not found. classes_file:{origin_classes_file}')
            return
        else:
            origin_classes = {}
            with open(origin_classes_file, mode='r', encoding=GLOBAL_ENCODING) as f:
                for cls_id, cls_name in enumerate(f.readlines()):
                    cls_name = cls_name.strip()
                    if cls_name != '':
                        origin_classes[cls_id] = cls_name

        # 获取所有原始图像文件名(包括后缀名)
        origin_image_filenames = os.listdir(origin_image_dir)

        # 随机打乱文件名列表
        random.shuffle(origin_image_filenames)

        # 计算训练集、验证集和测试集的数量
        total_count = len(origin_image_filenames)
        train_count = int(total_count * self.train_ratio)
        val_count = int(total_count * self.val_ratio)
        test_count = total_count - train_count - val_count

        # 定义训练集文件夹路径
        if self.clear_train_dir and os.path.exists(self.train_dataset_dir):
            shutil.rmtree(self.train_dataset_dir, ignore_errors=True)
        train_dir = os.path.join(self.train_dataset_dir, 'train')
        val_dir = os.path.join(self.train_dataset_dir, 'val')
        test_dir = os.path.join(self.train_dataset_dir, 'test')
        train_image_dir = os.path.join(train_dir, 'images')
        train_label_dir = os.path.join(train_dir, 'labels')
        val_image_dir = os.path.join(val_dir, 'images')
        val_label_dir = os.path.join(val_dir, 'labels')
        test_image_dir = os.path.join(test_dir, 'images')
        test_label_dir = os.path.join(test_dir, 'labels')

        # 创建训练集输出文件夹
        os.makedirs(train_image_dir, exist_ok=True)
        os.makedirs(train_label_dir, exist_ok=True)
        os.makedirs(val_image_dir, exist_ok=True)
        os.makedirs(val_label_dir, exist_ok=True)
        os.makedirs(test_image_dir, exist_ok=True)
        os.makedirs(test_label_dir, exist_ok=True)

        # 将图像和标签文件按设定的ratio划分到训练集,验证集,测试集中
        for i, filename in enumerate(origin_image_filenames):
            if i < train_count:
                output_image_dir = train_image_dir
                output_label_dir = train_label_dir
            elif i < train_count + val_count:
                output_image_dir = val_image_dir
                output_label_dir = val_label_dir
            else:
                output_image_dir = test_image_dir
                output_label_dir = test_label_dir
            src_img_name_no_ext = os.path.splitext(filename)[0]
            src_image_path = os.path.join(origin_image_dir, filename)
            src_label_path = os.path.join(origin_label_dir, src_img_name_no_ext + '.txt')
            if os.path.exists(src_label_path):
                # 复制图像文件
                dst_image_path = os.path.join(output_image_dir, filename)
                shutil.copy(src_image_path, dst_image_path)
                # 复制标签文件
                src_label_path = os.path.join(origin_label_dir, src_img_name_no_ext + '.txt')
                dst_label_path = os.path.join(output_label_dir, src_img_name_no_ext + '.txt')
                shutil.copy(src_label_path, dst_label_path)
            else:
                get_logger().error(f'no label file found for image file. img_file:{src_image_path}')
        train_dir = os.path.normpath(train_dir)
        val_dir = os.path.normpath(val_dir)
        test_dir = os.path.normpath(test_dir)
        get_logger().info(f'generate train, val, test data set. \n'
                          f'train_count:{train_count}, train_dir:{train_dir}\n'
                          f'val_count:{val_count}, val_dir:{val_dir}\n'
                          f'test_count:{test_count}, test_dir:{test_dir}')
        # 生成描述训练集的yaml文件
        data_dict = {
            'train': train_dir,
            'val': val_dir,
            'test': test_dir,
            'nc': len(origin_classes),
            'names': origin_classes
        }

        yaml_file_path = os.path.normpath(os.path.join(self.train_dataset_dir, 'data.yaml'))
        with open(yaml_file_path, mode='w', encoding=GLOBAL_ENCODING) as f:
            yaml.safe_dump(data_dict, f, default_flow_style=False, allow_unicode=True, encoding=GLOBAL_ENCODING)
        get_logger().info(f'generate the `data.yaml`. data:{data_dict}, yaml_file_path:{yaml_file_path}')
        get_logger().info('end to ')

if __name__ == '__main__':
    init_logger('logs/split_data.log')
    g_origin_dataset_dir = 'D:/YOLOv8Train/v8_origin_datasets/mktk_dataset'
    g_train_dataset_dir = 'D:/YOLOv8Train/v8_train_datasets/mktk_dataset'
    g_train_ratio = 0.7
    g_val_ratio = 0.15
    g_test_ratio = 0.15
    yolo_generator = YOLOTrainDataSetGenerator(g_origin_dataset_dir, g_train_dataset_dir, g_train_ratio, g_val_ratio,
                                               g_test_ratio, True)
    yolo_generator.generate()
原文链接:https://blog.csdn.net/u011775793/article/details/135008042
4.xml2txt
一般来说,获取到的数据集中包含图片和xml格式文本,而yolo训练时只能使用txt格式的坐标文件,所以我们需要将xml转换成txt,一般来说可以使用网上的现成代码。
例如
import glob
import os
import cv2
import shutil
import numpy as np
import xml.etree.ElementTree as ET

#  转换一个xml文件为txt
def single_xml_to_txt(xml_file, corr_img_path, save_txt_path):
    if os.path.exists(corr_img_path):
        try:
            img = cv2.imread(corr_img_path)
            true_width, true_height = img.shape[1], img.shape[0]
        except:
            # print(img_path)
            pass

    tree = ET.parse(xml_file)
    root = tree.getroot()
    # 保存的txt文件路径
    txt_file = save_txt_path + os.path.basename(xml_file.replace("xml", "txt"))
    with open(txt_file, 'w') as txt_file:
        try:
            picture_width = int(root.find('size')[0].text)
            picture_height = int(root.find('size')[1].text)
            #针对图片尺寸读取异常,进行尺寸修正
            if picture_width == 0 or picture_height == 0:
                picture_width = true_width
                picture_height = true_height
            if picture_width != true_width or picture_height != true_height:
                picture_width = true_width
                picture_height = true_height
            for member in root.findall('object'):
                class_name = member.find("name").text
                box_x_min = int(member.find("bndbox").find("xmin").text)
                box_y_min = int(member.find("bndbox").find("ymin").text)
                box_x_max = int(member.find("bndbox").find("xmax").text)
                box_y_max = int(member.find("bndbox").find("ymax").text)
                #针对标注框大小异常,进行截断操作,避免转换txt值异常
                if box_x_min < 0:
                    box_x_min = 0
                elif box_y_min < 0:
                    box_y_min = 0
                elif box_x_max > picture_width:
                    box_x_max = picture_width
                elif box_y_max > picture_height:
                    box_y_max = picture_height
                #  类名对应的index
                class_num = class_names.index(class_name)
                # 转成相对位置和宽高
                x_center = (box_x_min + box_x_max) / (2 * picture_width)
                y_center = (box_y_min + box_y_max) / (2 * picture_height)
                width = (box_x_max - box_x_min) / picture_width
                height = (box_y_max - box_y_min) / picture_height
                txt_file.write(str(class_num) + ' ' + str(x_center) + ' ' + str(y_center) + ' ' + str(width) + ' ' + str(height) + '\n')
        except:
            pass

#  转换文件夹下的所有xml文件为txt
def dir_xml_to_txt(xml_path, img_path, save_txt_path):
    for index, xml_file in enumerate(glob.glob(xml_path+ '*.xml')):
        corr_img_path = img_path + os.path.basename(xml_file).split(".")[0] + ".jpg"
        try:
            single_xml_to_txt(xml_file, corr_img_path, save_txt_path)
        except:
            print(xml_file)
        else:
            print("all:{}---now:{}".format(len(glob.glob(xml_path + '*.xml')), index+1))

if __name__ == '__main__':
    class_names = [''] #类名
    xml_path = r"" #xml文件路径
    img_path = r"" #图片路径
    save_txt_path = r"" #生成txt文件保存路径
    dir_xml_to_txt(xml_path, img_path, save_txt_path)
原文链接:https://blog.csdn.net/weixin_42206075/article/details/125520477?ops_request_misc=%257B%2522request%255Fid%2522%253A%2522171379106316800182163480%2522%252C%2522scm%2522%253A%252220140713.130102334..%2522%257D&request_id=171379106316800182163480&biz_id=0&utm_medium=distribute.pc_search_result.none-task-blog-2~all~top_positive~default-1-125520477-null-null.142^v100^pc_search_result_base7&utm_term=xml2txt&spm=1018.2226.3001.4187
请仔细检查代码,将你的文件路径对应后运行,这里需要一些python基础。
5.训练基础模型
这一步我们已经有了图片,以及与其一一对应的txt文件了。
我们可以开始训练模型了。
我们可以直接修改官方给的初始脚本
from ultralytics import YOLO

if __name__ == '__main__':
    # 加载模型
    model = YOLO("你yaml的绝对路径,或者相对你脚本的路径)  # 从头开始构建新模型
    例如我的初始yaml存在于
    E:\study\book\ultralytics-main\ultralytics\cfg\models\v8\yolov8.yaml(绝对路径)
    **注意,绝对路径名需要将\更改为/,\在python中为转义字符
    我的脚本文件处于ultralytics-main的根目录则
    ultralytics/cfg/models/v8/yolov8.yaml(相对路径)
    这里就填入这个,因你的文件位置而变"

    # 使用模型
    results = model.train(data="这里填入你的数据集的yaml,即上文数据集分割生产的yaml",
        device='0',
        epochs=100,  # 训练过程中整个数据集将被迭代多少次,显卡不行你就调小点
        batch= 8,  # 一次看完多少张图片才进行权重更新
        verbose=False,
        imgsz=640)  # 训练模型
这时就能正常开始训练了。
6.修改yaml训练
这里具体建议在csdn或bilibili搜索yolov8改进
关键词可以加上注意力等。